Assignment 8: Roguelike
Due: Friday, November 30 at 4:00pm
Submission cutoff: Monday, December 3 at 4:00pm
Warning: the policy of weighting your lowest score down does not apply to this homework, only to assignments 1-7.
For your last assignment, you’re going to do an extended dive into Lua by implementing systems and extensions for a simple ASCII-art roguelike game. You will create a homebrew typed class library, a coroutine-based state machine simulator, and an extremely efficient 2D vector library.
Setup
Docker (optional)
If you have docker installed, you can use the Dockerfile provided in the starter code directory.
# CD to assign8 starter code directory
docker build -t cs242-assign8 .
# Mount assignment directory into container at /assign8
docker run -v $PWD:/assign8 -it cs242-assign8 /bin/bash
You can then skip the rest of the setup.
Getting Lua
The first step is to install Lua, its package manager luarocks, and some tools required for building Lua native extensions.
# Ubuntu
sudo apt-get install lua5.3 liblua5.3-dev luarocks
# macOS
brew install pkg-config lua@5.3 luarocks
For Windows, we recommend using WSL, as it can be difficult to build native extensions on Windows.
Installing Lua Libraries
There are a couple libraries you need to install through luarocks.
# Ubuntu
sudo sh -c 'echo "termfx busted luacheck mobdebug debug.lua argparse" | xargs -n 1 luarocks install'
# macOS
echo "termfx busted luacheck mobdebug debug.lua argparse" | xargs -n 1 luarocks install
Editor Support
- Emacs - lua-mode
- Vim - lua.vim
- Atom - you need the
language-luapackage. I also recommend thelinter-luaparsepackage, which will highlight syntax errors.
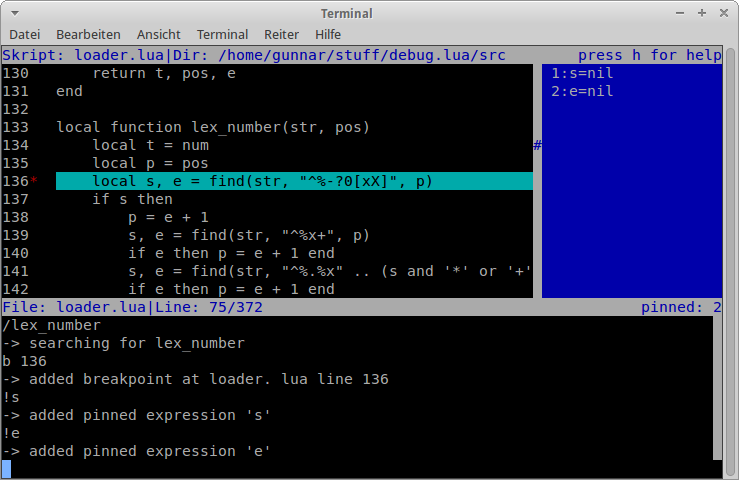
Debugging with MobDebug
Lua’s introspection capabilities are so powerful that most debugging tools are written in the language itself. The most popular tool is MobDebug, which starts a debug server in your application. You can insert the snippet below anywhere in your code to start the debug server.
require("mobdebug").start()
You can then connect to the server from a variety of clients. debug.lua is a terminal client, but if you find any others, you can use those. You can simply type debug.lua in your shell once the debug server has started.
Linting with Luacheck
Luacheck is a linter for Lua that can catch many common errors. You can run make check to analyze your code for errors. Lint errors won’t be used for grading purposes.
We strongly recommend that you run the linter frequently. It will help you avoid a number of silly, rage-inducing typos that take hours to debug.
Part 1: Class library (60%)
Recall from lecture how we could implement prototype-based object oriented programming in Lua using metatables. In this assignment, you’re going to write a library for OOP that looks closer to a traditional class-based system like in Python, except with a few twists. To get a sense of the design, here’s an example of a counter class.
local Counter = class({Object}, function(Class)
  function Class:constructor()
    self.n = 0
  end

  function Class:incr()
    self.n = self.n + 1
  end

  function Class:get()
    return self.n
  end
end, {n = types.Number})

local ctr = Counter:new()
ctr:incr()
ctr:incr()
assert(ctr:get() == 2)
assert(ctr.n == 2)
Here, class is a function that build a Lua table representing a class. It takes three arguments: a list of base classes, a function that adds methods to the class, and a table of fields with their corresponding types. This API will serve as the foundation of the game in the next section. Your task is to implement the class function.
Objects
First, you will implement the core functionality of instancing objects from a class template. In class/class.lua you will find a table Object (to be used in the next section) and an empty function class. As mentioned, this function takes three inputs, but we will only look at methods for now. class should return a Lua table Class that represents a class, containing a method Class:new(...) that constructs objects (instances of the class). For example, an object with no methods:
local EmptyClass = class({Object}, function(_) end, {})
local inst1 = EmptyClass:new()
local inst2 = EmptyClass:new()
The methods function is the means of associating methods with a class. It takes as input a table representing the class being created, and adds methods onto the table. For example:
local FooClass = class({Object}, function(Class)
  function Class:foo(x)
    return x + 1
  end
end, {})

local inst = FooClass:new()
assert(inst:foo(1) == 2)
Your task is to modify the class function to return a Class object that contains a Class:new() method that returns an instance of the class. Class:new() should create a Lua table that represents the object, and then use metatables (specifically __index) to link method calls on the object (e.g. inst:foo()) back to the class.
Some things to note about metamethods:
- Any methods such
__add,__len, etc. defined on the class object should be available as metamethods on the instance. - Metamethods do not need to be inherited. For example an
__addon a parent class does not need to be available on an instance of a child class. - Classes won’t try to define
__indexor__newindex, so they won’t clash with definitions required to implement inheritance and type-checking.
Note that because objects are normal Lua tables, we can freely get/set data fields (e.g.
inst.x = 1). We don’t need explicit declarations of fields like in Java/C++/etc.
To test your code, we have provided you a file class_tests.lua containing a series of increasingly complex tests for each part of this section. You can run these tests by executing make test from the command line. At the bottom, you may want to comment out calls to the tests you are not ready to run yet.
Constructors
Next, you need to add a constructor to your objects. A constructor is a function that is called whenever an object is created, and performs setup/initialization on the object. In our interface, we assume the constructor is called constructor, and use it if it exists. For example:
local ConstructorClass = class({Object}, function(Class)
  function Class:constructor(x)
    self.x = self:foo(x)
  end

  function Class:foo(x)
    return x + 1
  end
end, {x = types.Number})

local inst = ConstructorClass:new(1)
assert(inst.x == 2)
You should change Class:new to invoke the constructor on the created object. The constructor should only be called once the object has its metatable initialized so the constructor can refer to class methods, e.g. self:foo(x) above.
Since the constructor could take any number of arguments, Class:new must forward all arguments it receives to the constructor. To accomplish this, we can use Lua’s support for variable argument functions. For example:
local function f(x, y) return x + y end
local function app(f, ...)
  return f(...)
end
assert(app(f, 1, 2) == 3)
Inheritance
Now that the core object functionality is settled, the next step is to implement multiple inheritance. Multiple inheritance means a class can have many base classes, and draw functionality from each of them. Just as in lecture, the basic idea is that if a method is not defined on a class, then it should be looked up in all parent classes, and those parent’s parents, and so on until reaching Object. For example:
local A = class({Object}, function(Class)
  function Class:a() print('a') end
end, {})

local B = class({Object}, function(Class)
  function Class:b() print('b') end
end, {})

local C = class({B}, function(Class)
  function Class:a() print('c') end
  function Class:c() print('c') end
end, {})

local D = class({A, C}, function(Class)
  function Class:d() print('d') end
end, {})

local inst = D:new()
inst:a() -- resolves to A, not C
inst:b() -- resolves to C -> B
inst:c() -- resolves to C
inst:d() -- resolves to D
Our mechanism for multiple inheritance is that methods should be looked up through a left-to-right depth-first search. (Note: this is a very naive way of implementing multiple inheritance, e.g. see how method resolution order is defined in Python.) While this may seem complex, Lua enables a surprisingly simple implementation of this concept.
As discussed in class, the key idea is to use metatables on your classes themselves. When an object uses a metatable to lookup a method on its class, the class should also use a metatable to lookup missing methods on its parent (or base) classes. You should be able to implement this in ~8 lines of Lua code. You may find it helpful to read about Multiple Inheritance for prototype-based objects.
Types
Now you have a fully-functioning object system! The last step is to implement some basic mechanisms for catching bugs through runtime type-checking. As mentioned above, because objects are Lua tables, we can freely get/set data fields. However, this means we could easily mess up by providing a number where a string was expected, or misspelling a field name, or so on. To avoid these issues, you are going to implement a simple type library that enables us to dynamically type-check class fields. For example:
local TypeClass = class({Object}, function(_) end,
  {x = types.Number, y = types.Table(types.String, types.Number)})
local inst = TypeClass:new()
inst.x = "Hello" -- error: x has type number, was given string
inst.y = {foo = 0} -- ok
First, you will implement a small typing library in class/types.lua. Specifically, we represent types as tables with a single method Type:is(value) that returns true if the value is of the given type, and false otherwise. For example:
assert(types.Number:is(0))
assert(not types.Number:is(nil))
For lists and tables, we have type constructors that create objects with these methods.
local numlist = types.List(types.Number)
assert(numlist:is({1, 2, 3}))
assert(not numlist:is({"a", "b", "c"}))
Implement the appropriate objects for each primitive type, and implement the list/table type constructors. We have provided you tests in type_tests.lua (automatically run with make test) that you can use to check your work. A few notes on the specfication:
- For primitive types, you should use the
typefunction to get the Lua type of a value. - For composite types (lists/tables), you should deeply inspect all elements of the given value. For example,
numlist:is({1, "a"})should fail. - For List types, don’t worry about negative integer keys, non-integer keys, or
nilholes in the table.
Typed fields
With your typing library in hand, it’s time to complete the class system implementation. Each call to class comes with a datatypes table mapping names (fields) to types. Rather than expensively validating every field access to an object, we are going to adopt a different approach of just checking the first time a field is set. For this, we can use the __newindex metamethod. Your objects should use __newindex to check that a requested key exists in the class’s datatype table, and to ensure that the provided value matches the expected type. If these checks pass, you can continue setting the field using rawset.
There are two important features required of this design. First, datatypes should work properly with inheritance. For example:
local A = class({Object}, function(_) end, {x = types.Number})
local B = class({A}, function(_) end, {y = types.String})
local inst = B:new()
inst.x = 1       -- datatype for x inherited from A
inst.y = "Hello" -- datatype for y direct from B
inst.z = false   -- invalid, no datatype
You can accomplish this by using a similar __index metatable lookup scheme for your datatypes as you did for your methods.
Second, datatypes should work properly with your class system. For example:
local A = class({Object}, function(_) end, {})
local B = class({A}, function(_) end, {})
local C = class({Object}, function(_) end, {x = A})

local c = C:new()
c.x = A:new()      -- valid
c.x = B:new()      -- valid, B is a subclass of A
c.x = Object:new() -- invalid, Object is not a subclass of A
To achieve this, you will need to extend your type system to classes as types. You should use the following strategy:
- First, every object should have an
a:type()method, which gives you the class of the object. - You need to be able to access a class’s parent classes from the class object.
- Implement
Object.is(class, val). A recursive helper function can be used. - Make
Class.isavailable on every class object.
In the example above, A:is(B:new()) and A:is(A:new()) are true, while A:is(Object:new()) is false.
After having completed this section, you should be passing all the tests in class_tests.lua and type_tests.lua.
Part 2: Roguelike
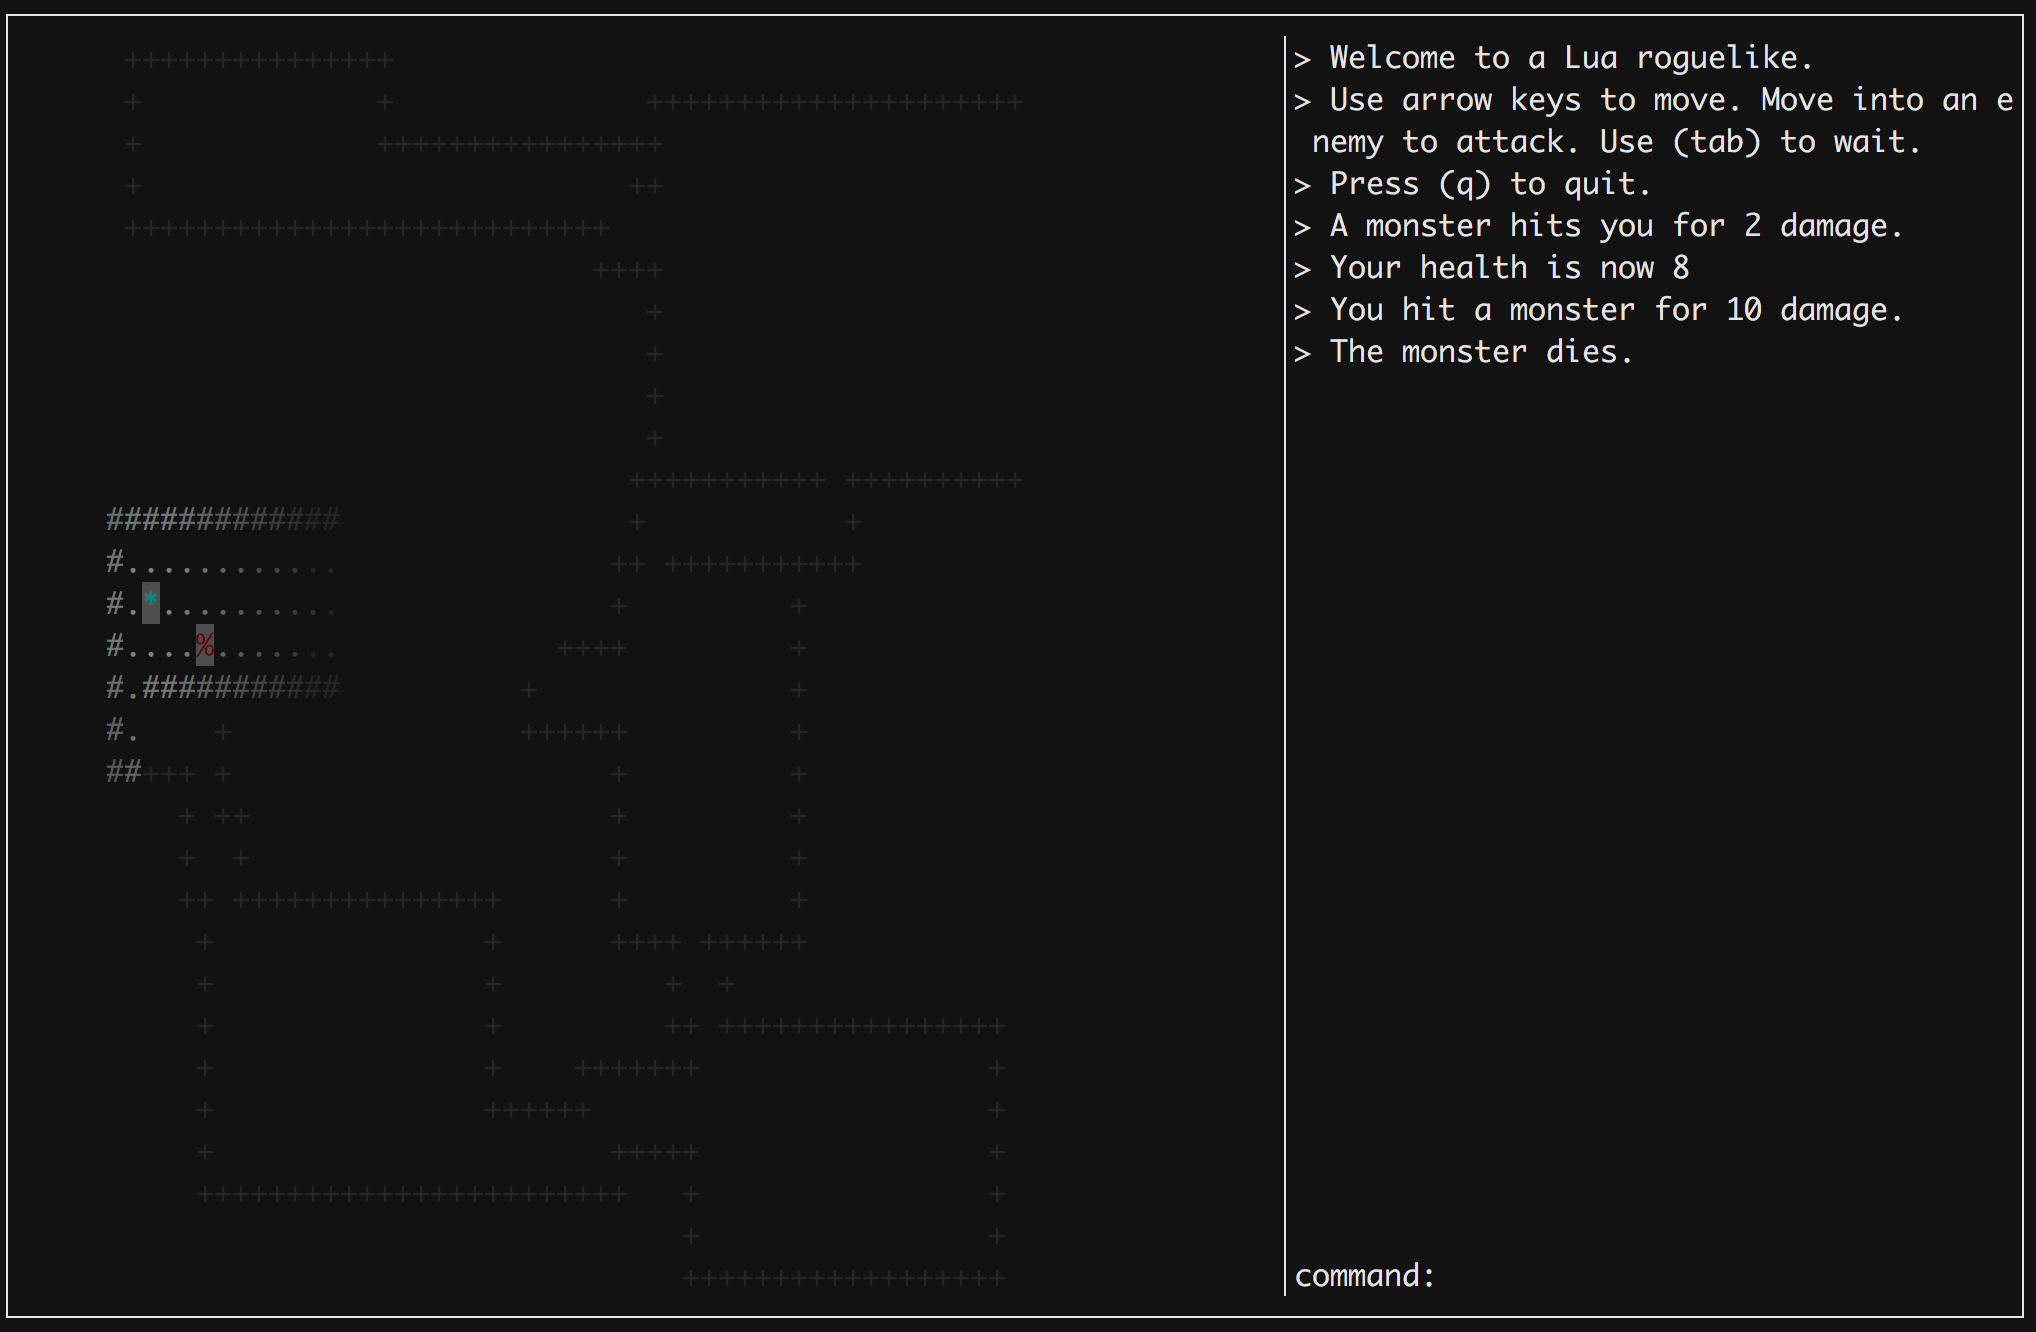
To provide more thorough testing for your class library and provide you a chance to use it in practice, we have built for you most of a roguelike ASCII-art game. This game consists of wandering around a dungeon and running into monsters until they are vanquished. We have distributed a reference solution for the game so you can try it out:
lua5.3 roguelike.bin
The implementation of the game has the following structure.
- The map is a 2D grid of
Tileobjects (game/tile.lua), represented by integer coordinates described with thePointclass (point/point.lua). The map is stored inGame.tiles(game/game.lua). - Lighting (
game/light.lua) and rendering is handled insideGame:drawwhich uses thetermfxlibrary to draw the game state onto the screen. - The map’s grid contains instances of the
Entityclass (game/entity.lua), which represent movable objects including the user (theHero, seegame/hero.lua) and the three monsters (game/monster.lua). - Entities are built around callbacks—for example, if an entity collides with another entity, then the game will call the
Collidemethod. On every game tick (whenever the user inputs a move command), the game will callThinkon every entity.
If your class library is fully functional, then the game should work almost as expected, modulo the behavior of monsters. To run the game with your version of the class library, run:
lua5.3 roguelike.lua
Before moving on, ensure that the game runs as expected, so you don’t have any latent bugs in your class library.
Coroutines (20%)
Your main task for this section will be to implement a state machine for the monster behavior. However, this won’t be any ordinary state machine implementation—we will explore the use of coroutines, a wonderful, underappreciated control-flow construct. Quoting from PIL:
A coroutine is similar to a thread (in the sense of multithreading): a line of execution, with its own stack, its own local variables, and its own instruction pointer; but sharing global variables and mostly anything else with other coroutines. The main difference between threads and coroutines is that, conceptually (or literally, in a multiprocessor machine), a program with threads runs several threads concurrently. Coroutines, on the other hand, are collaborative: A program with coroutines is, at any given time, running only one of its coroutines and this running coroutine only suspends its execution when it explicitly requests to be suspended.
In programming systems with multiple independent threads of control, a key question is: who decides which threads are running, and how? When using system threads (e.g. pthreads in C, or std::thread in Rust), we delegate this responsibility to the operating system, e.g. the Completely Fair Scheduler which adopts some heuristics that try to work for any workload that may be run in the OS.
By contrast, coroutines pull this responsibility back to the programmer. It enables (or burdens) you to choose which thread should be running and when through explicit context switches. In Lua, using a coroutine looks like this:
local function compute_primes()
  local i = 2
  local primes = {}
  while true do
    local is_prime = true
    for _, v in ipairs(primes) do
      if i % v == 0 then
        is_prime = false
        break
      end
    end

    if is_prime then
      table.insert(primes, i)
      coroutine.yield(i)
    end

    i = i + 1
  end
end

local co = coroutine.create(compute_primes)
print(coroutine.status(co)) -- suspended
print(coroutine.resume(co)) -- true   2
print(coroutine.resume(co)) -- true   3
print(coroutine.resume(co)) -- true   5
Here, coroutine.create takes a function and turns it into a coroutine (similar to thread::spawn). A coroutine is a first-class value in Lua, which can be accessed using coroutine.status to inspect whether the coroutine has exited, and coroutine.resume that explicitly passes control to the coroutine. The trickiness arises around coroutine.yield inside of compute_primes. What this says is: suspend execution of the current function, and return the yield arguments back to the caller of resume (resume also returns a boolean for whether the coroutine has errored).
Subsequent calls to resume will start after the last yield. Even calling though the compute_primes function looks like it should loop forever (while true without any return), the yield is what enables us to pass control to and from the prime computation.
State machines
Coroutines have many uses. PIL discusses pipes and filters, iterators (like above), and non-preemptive multitasking. David Beazley’s “Curious Course on Coroutines and Concurrency” is an excellent deep dive on Python coroutines. In this assignment, we will explore the relation between coroutines and state machines. For example, here’s a simple state machine:
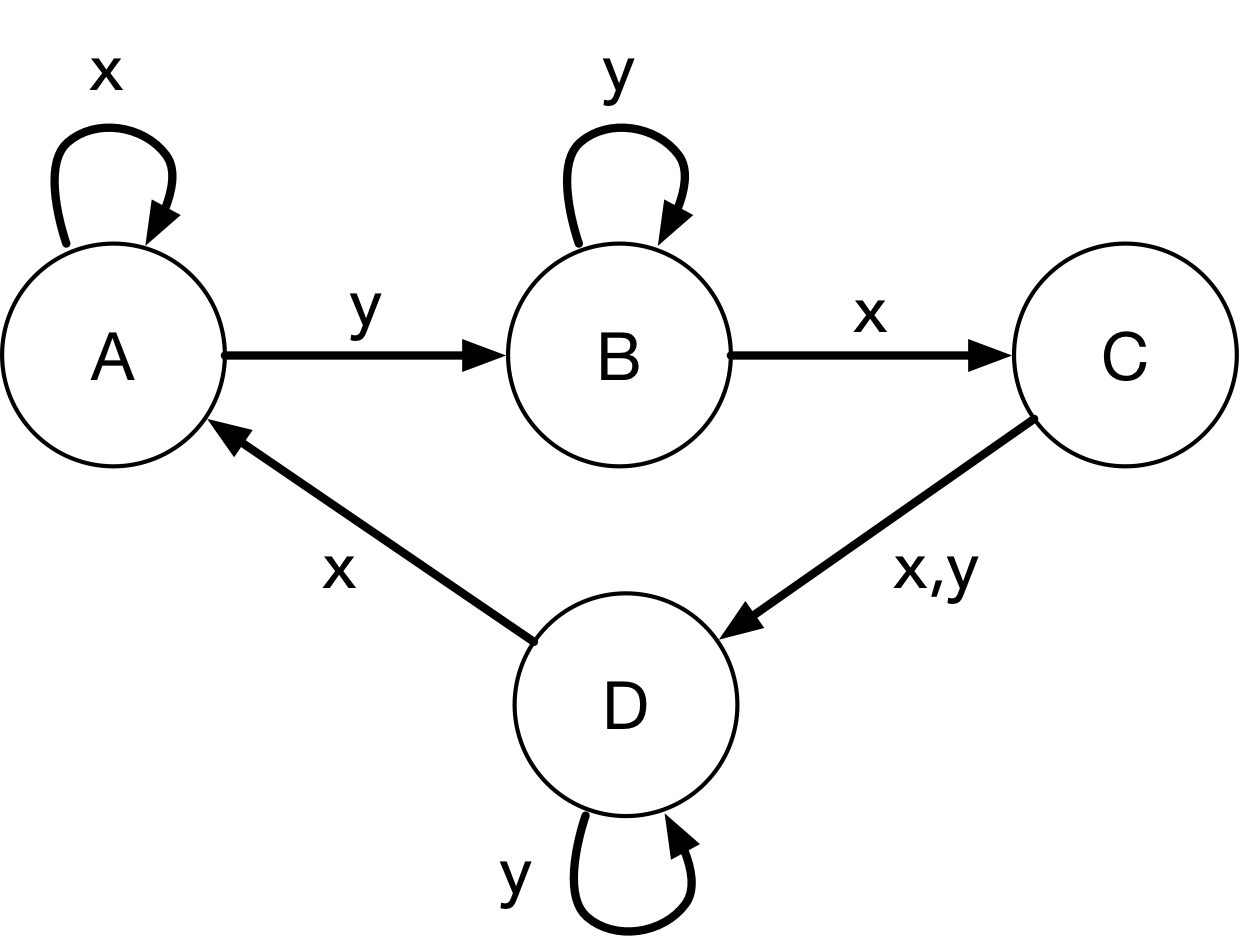
Normally we encode state machines using a series of explicit state variables with verbose transitions.
local STATE_A = 0
local STATE_B = 1
local STATE_C = 2
local STATE_D = 3

local function step(state, input)
  if state == STATE_A then
    if input == 'x' then
      return STATE_B
    else
      return STATE_A
    end
  elseif state == STATE_B then
    if input == 'y' then
      return STATE_B
    elseif input == 'x' then
      return STATE_C
    end
  elseif ... then
    -- and so on
    ...
  end
end

local state = STATE_A
while true do
  state = step(state, read_input())
end
By contrast, the equivalent coroutine looks like:
local function statemachine()
  while true do
    -- state A
    while coroutine.yield() == 'x' do end
    -- state B
    while coroutine.yield() == 'y' do end
    -- state C
    coroutine.yield()
    -- state D
    while coroutine.yield() == 'y' do end
  end
end

local co = coroutine.create(statemachine)
while true do
  coroutine.resume(co, read_input())
end
Converting a state machine from straight line code to a coroutine often allows us to eliminate explicit state variables, instead representing the state implicitly by where we are in the coroutine.
Monsters
With that knowledge in hand, your task for this portion is to implement one of the characters in the game, the monster that runs towards the player to attack. In monster.lua, we have provided you a monster skeleton (heh) with two key methods: Monster:think() that runs every game tick and executes the coroutine, along with Monster:logic() that contains the logic for the state machine. Your monster should implement the following state machine:

In plain English:
- In the beginning, the monster is idle. While the monster is idle and doesn’t see the hero, it should attempt to move to a random tile adjacent to itself.
- If the monster sees the hero:
- If its health is greater than or equal to 20, and it’s greater than 1 tile away from the hero, then it moves in the direction of the hero until it’s within 1 tile. Once it’s within range, it attempts to attack the hero twice, and then resets to idle.
- If the health is less than 20, then the monster attempts to run in the opposite direction of the hero.
- If at any point the monster loses sight of the hero, it resets to idle.
A few notes on this implementation. To accomplish some of these goals (like visibility testing), you should look at the methods available on the Entity class in entity.lua, of which Monster is a subclass. You will likely use Entity:can_see, Entity:health, Entity:path_to, Game:try_move, Point:new, and Point:dist.
Testing
As mentioned above, you can use lua5.3 roguelike.lua to run the game. You can use the --seed option to specify a seed and --lights-on to make the entire map visible. Finally, you can run lua5.3 game/game_tests.lua to run game tests (included as part of make test). Because the tests run a replay of inputs, you have to match the solution behavior exactly.
Part 3: Fast points
One of the classes we use in the game is the Point class defined in point/point.lua that represents a 2D coordinate or vector. The class itself is relatively simple, but it’s important that it be fast—although our game is relatively small, games frequently require thousands or millions of instances of classes like Point. In this final portion of the assignment, you will use the Lua C API discussed in lecture to create a fast implementation of the Point class.
Lua C API
Lua is a language designed to be embedded in applications. Lua is used as a scripting language in games (World of Warcraft, Garry’s Mod, SimCity, etc.) and in tools (Nginx, Adobe Lightroom, Wikipedia, etc.). This design goal is reflected in the size and simplicity of the interpreter and its API. The Lua source tree is 35 files and 700 KB, and it compiles in <1 second on my laptop. By contrast, the Python source is 4,000 files, 300 MB, and takes over a minute to compile.
The primary means of interfacing with Lua is through its C API. You can browse the headers on Github and find a more thorough introduction in Programming in Lua. The C API offers two main modes of use: running a Lua interpreter (calling from C into Lua), and distributing a Lua library (calling from Lua into C). The former is common when embedding Lua in an application. For example, here’s a C program that runs a simple print command:
// headers omitted

int main () {
  // Create state of the interpreter
  lua_State* L = luaL_newstate();

  // Put standard libraries into global namespace
  luaL_openlibs(L);

  // Tell Lua to run the given string
  char* cmd = "print('hi')";
  luaL_loadbuffer(L, cmd, strlen(cmd), "");
  lua_pcall(L, 0, 0, 0);

  // Deallocate interpreter state
  lua_close(L);
}
The latter modality, calling from Lua into C, is what we will focus on here. The main design challenge in interfacing between C and Lua is that of memory management. Lua uses a tracing garbage collector, but it only tracks values within the context of the Lua runtime. If a C API gets a Lua GC-owned pointer and starts passing it around, Lua could easily deallocate it even while a C function still holds that reference, causing memory errors.
To address this issue, the core Lua API uses a virtual stack to share values between C and Lua. For example, here’s a simple function that increments a table value by 1. On the Lua side:
local example = require "example"
local t = {x = 1}
example.incr_el(t)
assert(t.x == 2)
And on the C side:
static int incr_el(lua_State* L) {
  lua_pushstring(L, "x");
  lua_gettable(L, 1);
  double n = luaL_checknumber(L, 2);
  lua_pushstring(L, "x");
  lua_pushnumber(L, n + 1);
  lua_settable(L, 1);
  return 0;
}
The basic idea is that rather than having an explicit handle to a lua_Table* object that we manipulate directly, the Lua C API exposes a series of functions that manipulate a stack (associated with the lua_State object). When we enter the function, the arguments are placed on the stack, and subsequent operations push and pop from the stack. (Hmm… a stack machine… where have we seen this before?) This is the sequence of stacks in the above example:

Aside: for an example of a different API design, Python’s C API uses explicit reference counting. That makes it simpler in a sense (no stack to deal with), but more fragile (easy to mess up reference counts).
Some operations use an explicit stack index to refer to the table being changed. For example, lua_gettable pops the table key from the stack, then pushes the table value onto the stack where the table is at the indexed location. Indices can either be positive (from the bottom of the stack) or negative (from the top of the stack). Similarly, luaL_checknumber is more a peek than a pop—it reads a number at the given index, raising a Lua error if the value is not a number. For an exhaustive reference, see this website.
These mechanisms allow us to have a memory-safe API to Lua values. But what about passing complex C values (e.g. structs) into Lua? For this, Lua has one final first-class type to discuss: userdata. Userdata is a blob of memory that can only be touched by C, but is memory-managed (i.e. garbage-collected) by the Lua runtime. Here’s an example of a userdata-based API for exposing a simple counter library to Lua.
typedef struct {
  int counter;
} counter_t;

static int counter_new(lua_State* L) {
  counter_t* c = (counter_t*) lua_newuserdata(L, sizeof(counter_t));
  c->counter = 0;
  return 1;
}

static int counter_get(lua_State* L) {
  counter_t* c = (counter_t*) lua_touserdata(L, 1);
  lua_pushnumber(L, c->counter);
  return 1;
}

static int counter_incr(lua_State* L) {
  counter_t* c = (counter_t*) lua_touserdata(L, 1);
  c->counter++;
  return 0;
}

int luaopen_counter(lua_State* L) {
  lua_createtable(L, 1, 0);

  lua_pushstring(L, "new");
  lua_pushcfunction(L, counter_new);
  lua_settable(L, -3);

  lua_pushstring(L, "get");
  lua_pushcfunction(L, counter_get);
  lua_settable(L, -3);

  lua_pushstring(L, "incr");
  lua_pushcfunction(L, counter_incr);
  lua_settable(L, -3);

  return 1;
}
And the corresponding Lua:
local counter = require "counter"
local c = counter.new()
print(counter.get(c)) -- 0
counter.incr()
print(counter.get(c)) -- 1
Above, lua_newuserdata is essentially malloc, but for garbage-collected pointers. I also included the luaopen_counter function, which is what registers each function with the lua runtime by creating a table and pushing functions into it. With that, you’ve seen most of the core concepts in the Lua C API. You can read more in PIL - The C API.
C -> Rust
But of course, life isn’t that easy—we wouldn’t deign to use such a lowly language as C, so we have to use unsafe Rust! Using bindgen, we can automatically convert C headers into Rust modules. See lauxlib.rs in the starter code for an example. Using these bindings, we can turn this C code:
static int incr_el(lua_State* L) {
  lua_pushstring(L, "x");
  lua_gettable(L, 1);
  double n = luaL_checknumber(L, 2);
  lua_pushstring(L, "x");
  lua_pushnumber(L, n + 1);
  lua_settable(L, 1);
  return 0;
}
Into this Rust code:
unsafe extern "C" fn incr_l(L: *mut lua_State) -> c_int {
  lua_pushstring(L, cstr("x"));
  lua_gettable(L, 1);
  let n = luaL_checknumber(L, 2);
  lua_pushstring(L, cstr("x"));
  lua_pushnumber(L, n + 1);
  lua_settable(L, 1);
  return 0;
}
Beyond syntactic differences, one change is the function signature: unsafe indicates the function is allowed to call unsafe functions (everything in the Lua API is considered unsafe). extern "C" means “make sure this function adheres to the C calling convention” (see here for other options). The only other major difference is that strings need to be wrapped with cstr to convert them appropriately into a char*. Note that we use raw pointers (i.e. *mut as opposed to &mut) for pointers gotten from the C API.
Point library (20%)
Now, your task is to implement the Rust point library for use in the game. Specifically, you will implement the following functions (prefixed with point_): add, dist, sub, x, y, setx, sety, tostring. We have provided you with a sample implementation of point_eq. The end result will be a class that functions identically to the Point class in point.lua, except must faster! This native Point class does not need to implement p:isinstance(cls).
Note: we have already implemented the function
luaopen_point_native_pointwhich is the function called when yourequirethe Rust library. This sets up thePointclass table for you—you just need to implement the class’s methods. This function also creates the"point_native"metatable.
All the code for this portion is in point/native_point.rs. We have defined for you at the top a Point struct that represents an instance of a Point with an x and y of type lua_Number (which will be f64 on our platforms). You will need pass around handles to Point pointers using Lua userdata. Specifically, you will need to investigate the following functions:
lua_newuserdataluaL_checkudataluaL_getmetatablelua_setmetatablelua_pushnumberlua_pushbooleanlua_pushstring
Userdata can have metatables just like normal tables, including the __index method. We have created for you the "point_native" metatable that contains an __index equal to the method list defined in luaopen_point_native_point, so setting a userdata’s metatable to "point_native" will enable method lookup to work as expected.
Building and testing
First, you need to rename a file based off whether you are on linux or macOS.
# Linux
mv point/lauxlib.linux.rs point/lauxlib.rs
# macOS
mv point/lauxlib.macos.rs point/lauxlib.rs
To build a Lua module out of your Rust file, we use rustc to create a shared library. This build process is defined by the Makefile, so you can build by running:
make
To test your native_point.rs, you can run correctness tests as follows:
lua5.3 point/point_tests.lua
You can benchmark your Rust implementation against the Lua implementation using the code below. Your Rust implementation should be much faster!
lua5.3 point/benchmark_point.lua
You can also test your implementation inside the game by running it with:
lua5.3 roguelike.lua --native-point
Submitting
Create a submission zip by running make submission. Upload submission.zip to Gradescope.